Getting Started with Three.js in Webflow: Building 3D Experiences
Sabareesh S
Mar 17, 2025
5 min read

Why Three.js?

Ever wanted to add some mind-blowing 3D elements to your Webflow site? That's where Three.js comes in. It's a powerful JavaScript library that lets you create immersive, interactive web experiences. Whether you're looking to boost engagement, make your brand look cutting-edge, or just impress visitors, Three.js can take your site to the next level. Integrating Three.js into Webflow might seem complex at first, but it's simpler than you think. Let's go through the process step by step.


Step 1: Setting Up Three.js

First things first, we need to bring in the Three.js library and set up a canvas where our 3D magic will happen. Add the following scripts to your Webflow project:

1<script src="https://cdnjs.cloudflare.com/ajax/libs/three.js/r134/three.min.js"></script>
2<script src="https://cdn.jsdelivr.net/npm/three@0.141.0/examples/js/controls/OrbitControls.js"></script>

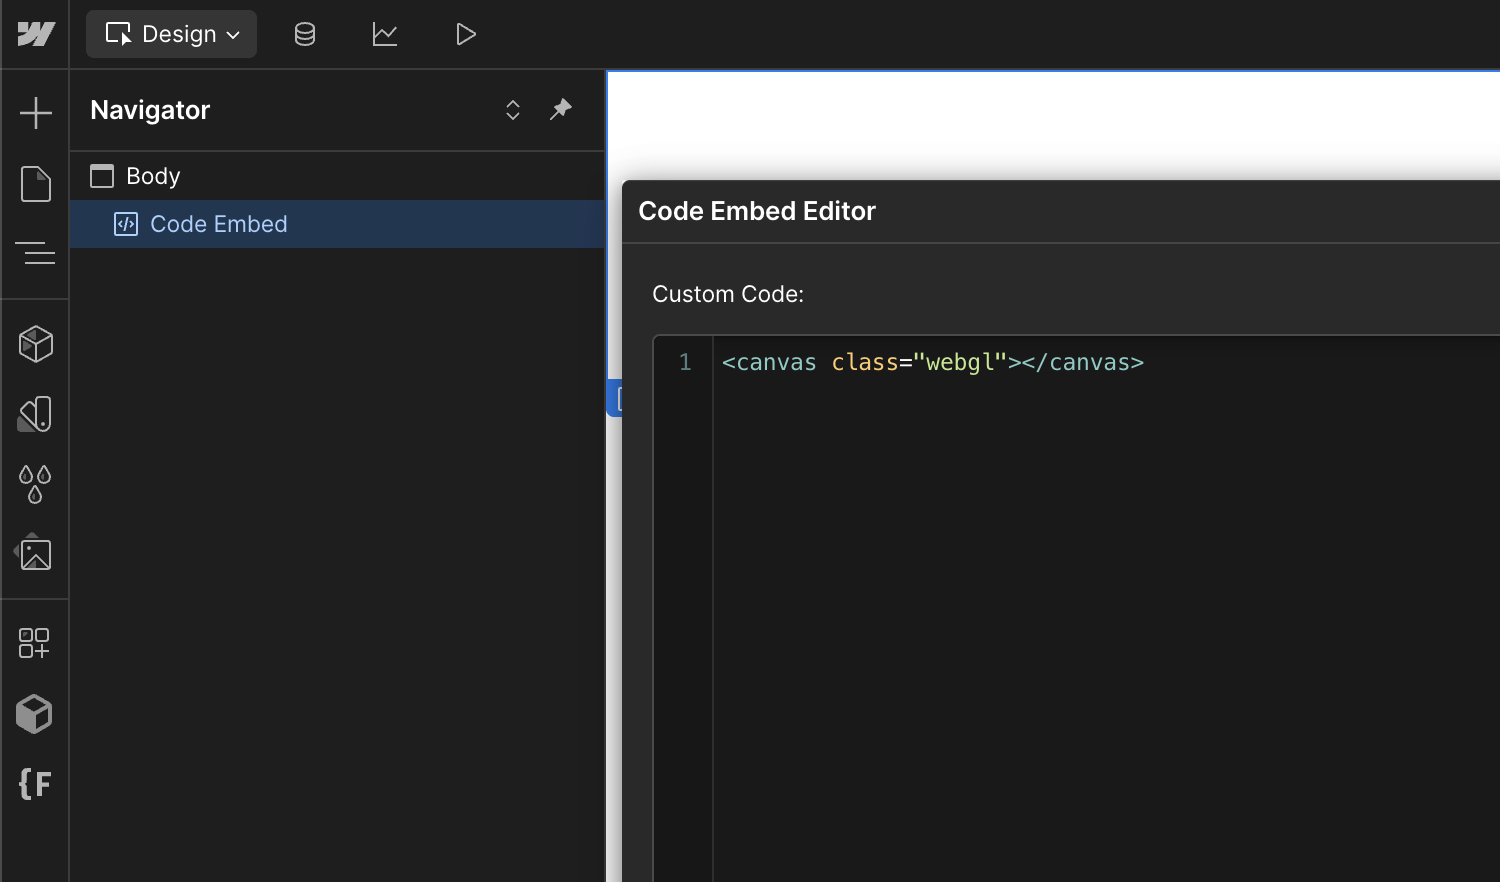
This includes the main Three.js library along with OrbitControls, which allows users to interact with the 3D scene. The <canvas> element is where everything will be rendered. Add the canvas element and assign it a classname “.webgl”.

Step 2: Initializing the Scene

Now, let’s set up the scene, camera, and renderer.

const canvas = document.querySelector('canvas.webgl')const scene = new THREE.Scene()
const camera = new THREE.PerspectiveCamera(75, window.innerWidth / window.innerHeight, 0.1, 100)
const renderer = new THREE.WebGLRenderer({ canvas: canvas, antialias: true })const controls = new THREE.OrbitControls(camera, canvas)

Here’s what’s happening:

  • We create a new Three.js scene.
  • Set up a perspective camera (so things look natural).
  • Initialize the renderer and attach it to our <canvas>.
  • Add OrbitControls so users can move around the scene.


Step 3: Adding a 3D Object and Animating It

What’s a 3D scene without an actual 3D object? Let’s add a simple rotating cube.

const cube = new THREE.Mesh(
    new THREE.BoxGeometry(1, 1, 1),
    new THREE.MeshBasicMaterial({ color: 0xff0000 })
)
scene.add(cube)

const clock = new THREE.Clock()
let lastElapsedTime = 0

const tick = () => {
    const elapsedTime = clock.getElapsedTime()
    const deltaTime = elapsedTime - lastElapsedTime
    lastElapsedTime = elapsedTime

    controls.update()
    cube.rotation.y += 0.01
    renderer.render(scene, camera)
    window.requestAnimationFrame(tick)
}
tick()

Boom! Now you’ve got a red cube that rotates. The tick() function creates an animation loop, updating the scene every frame.


Step 4: Loading GLTF Models

Want to use something fancier than a basic cube? Load a GLTF model. First, include the GLTFLoader script:

<script src="https://cdn.jsdelivr.net/npm/three@0.141.0/examples/js/loaders/GLTFLoader.js"></script>

Then, load your 3D model:

const gltfLoader = new THREE.GLTFLoader()
gltfLoader.load(
    'YOUR_GLTF_MODEL_URL', // Replace this with your actual model URL
    (gltf) => {
        scene.add(gltf.scene)
    }
)


Just swap out 'YOUR_GLTF_MODEL_URL' with the actual URL where your model is hosted. Now you've got a full-fledged 3D object in your scene!

Wrapping Up

And that’s it! You’ve successfully integrated Three.js into Webflow. From here, you can tweak materials, lighting, animations, and even add physics. Play around with different models and effects to make your site truly stand out.

Also, if you're aiming to create immersive, visually captivating websites using Three.js and Webflow, we're here to help. Reach out anytime for insights or guidance. Happy coding!

Three.js in Webflow

Why Three.js?

Ever wanted to add some mind-blowing 3D elements to your Webflow site? That's where Three.js comes in. It's a powerful JavaScript library that lets you create immersive, interactive web experiences. Whether you're looking to boost engagement, make your brand look cutting-edge, or just impress visitors, Three.js can take your site to the next level. Integrating Three.js into Webflow might seem complex at first, but it's simpler than you think. Let's go through the process step by step.


Step 1: Setting Up Three.js

First things first, we need to bring in the Three.js library and set up a canvas where our 3D magic will happen. Add the following scripts to your Webflow project:

1<script src="https://cdnjs.cloudflare.com/ajax/libs/three.js/r134/three.min.js"></script>
2<script src="https://cdn.jsdelivr.net/npm/three@0.141.0/examples/js/controls/OrbitControls.js"></script>

This includes the main Three.js library along with OrbitControls, which allows users to interact with the 3D scene. The <canvas> element is where everything will be rendered. Add the canvas element and assign it a classname “.webgl”.


Step 2: Initializing the Scene

Now, let’s set up the scene, camera, and renderer.

const canvas = document.querySelector('canvas.webgl')const scene = new THREE.Scene()
const camera = new THREE.PerspectiveCamera(75, window.innerWidth / window.innerHeight, 0.1, 100)
const renderer = new THREE.WebGLRenderer({ canvas: canvas, antialias: true })const controls = new THREE.OrbitControls(camera, canvas)

Here’s what’s happening:

  • We create a new Three.js scene.
  • Set up a perspective camera (so things look natural).
  • Initialize the renderer and attach it to our <canvas>.
  • Add OrbitControls so users can move around the scene.


Step 3: Adding a 3D Object and Animating It

What’s a 3D scene without an actual 3D object? Let’s add a simple rotating cube.

const cube = new THREE.Mesh(
    new THREE.BoxGeometry(1, 1, 1),
    new THREE.MeshBasicMaterial({ color: 0xff0000 })
)
scene.add(cube)

const clock = new THREE.Clock()
let lastElapsedTime = 0

const tick = () => {
    const elapsedTime = clock.getElapsedTime()
    const deltaTime = elapsedTime - lastElapsedTime
    lastElapsedTime = elapsedTime

    controls.update()
    cube.rotation.y += 0.01
    renderer.render(scene, camera)
    window.requestAnimationFrame(tick)
}
tick()

Boom! Now you’ve got a red cube that rotates. The tick() function creates an animation loop, updating the scene every frame.


Step 4: Loading GLTF Models

Want to use something fancier than a basic cube? Load a GLTF model. First, include the GLTFLoader script:

<script src="https://cdn.jsdelivr.net/npm/three@0.141.0/examples/js/loaders/GLTFLoader.js"></script>

Then, load your 3D model:

const gltfLoader = new THREE.GLTFLoader()
gltfLoader.load(
    'YOUR_GLTF_MODEL_URL', // Replace this with your actual model URL
    (gltf) => {
        scene.add(gltf.scene)
    }
)


Just swap out 'YOUR_GLTF_MODEL_URL' with the actual URL where your model is hosted. Now you've got a full-fledged 3D object in your scene!

Wrapping Up

And that’s it! You’ve successfully integrated Three.js into Webflow. From here, you can tweak materials, lighting, animations, and even add physics. Play around with different models and effects to make your site truly stand out.

Also, if you're aiming to create immersive, visually captivating websites using Three.js and Webflow, we're here to help. Reach out anytime for insights or guidance. Happy coding!

Share this post
Copied!